
FREELY - Vacuum Cleaner IMETEC - Free user manual and instructions
Find the device manual for free FREELY IMETEC in PDF.


| Product Type | Bagless Stick Vacuum Cleaner |
| Brand | Imetec |
| Model | FREELY |
| Dimensions (LxWxH) | 25 cm x 15 cm x 110 cm |
| Weight | 2.5 kg |
| Power Supply | 220-240 V, 50-60 Hz |
| Motor Power | 600 W |
| Suction Power | 15 kPa |
| Dust Capacity | 0.5 L |
| Filtration System | Washable HEPA filter |
| Cord Length | 5 m |
| Noise Level | 78 dB(A) |
| Number of Attachments | 3 (crevice tool, brush, upholstery tool) |
| Floor Type | Hard floors, carpets |
| LED Headlights | Yes (2 LEDs) |
| Wall Mountable | Yes |
| Dust Cup Emptying | One-button bottom release |
| Filter Maintenance | Washable, recommended every month |
| Energy Class | A |
| Warranty | 2 years |
Frequently Asked Questions - FREELY IMETEC
User questions about FREELY IMETEC
0 question about this device. Answer the ones you know or ask your own.
Ask a new question about this device
Download the instructions for your Vacuum Cleaner in PDF format for free! Find your manual FREELY - IMETEC and take your electronic device back in hand. On this page are published all the documents necessary for the use of your device. FREELY by IMETEC.
USER MANUAL FREELY IMETEC


![[E1] 9](/content/2026/06/1278709/images/e22487e92b868336f77fc9a573807fb546263dee61a1bcbe51526fb4c0eb561b.jpg)
![[E2] 2 1](/content/2026/06/1278709/images/2d4d26fb251a8cd58326fe083895af4c3401acc4a1f239c00d4124cc356576ac.jpg)
![[F1] 16](/content/2026/06/1278709/images/1af32d826a75f0519935c007d9592fe16412c8d5a5f9449693235f95d6074be9.jpg)
![[G1] MAX MAX](/content/2026/06/1278709/images/b86f9bd890f2ff3387fad67a535ef433baaf2bcca15ec17e989aacaa6fcfb617.jpg)
![[G2] 15 18](/content/2026/06/1278709/images/5a88d51f8ce4be134ccc030878237c995987b605e71ddfdb0f29213ba12ab1cb.jpg)
![[G3] 18C 18D](/content/2026/06/1278709/images/3d73043a6ebab5d024bcac466d8f199c21ed1cc971717d686e938645a8dca71f.jpg)
![[G4] 18B 18F](/content/2026/06/1278709/images/90cd8e9a01b26756744ddcb5e94ee54a69e4384d38b011f184ffbfe41e3baa7b.jpg)
![[G5] 18E 18F](/content/2026/06/1278709/images/14382417b7ce6a20c654b45dfd1e60ae0b22696c803452db11b85e2789144633.jpg)
natural_image
Diagram of a hand operating a mechanical component with directional arrows (no text or symbols)![[G7] 15 18](/content/2026/06/1278709/images/59e531b21f6cd52a75ffb2d9e2be4549bc252750d6a5ba33a4ea93df275a8abf.jpg)
![[G8] 17](/content/2026/06/1278709/images/9260ce81fa148b8cfd8d22a27b622ec79b5638d6f130dbd13dfaf091e11e59cf.jpg)
![[G9] 11](/content/2026/06/1278709/images/e0a61772d0dfb70461c6c437bb90d1e0d8f025bb337dfd7235fd2c495e568947.jpg)
![[G10] 10](/content/2026/06/1278709/images/2fd980189914fb92d713a2cfc54fda1d295e92d639be58eba82f34e76fa1d697.jpg)
![[H1] 6 12A 6 12B](/content/2026/06/1278709/images/37ff1b320a7d0c536c1d4f191c705fa84c384f54ea8ed9ba9407d6a1a7e935f9.jpg)
![[H2]](/content/2026/06/1278709/images/bb9e00afdd5053dc2b3d4a445906dcdc929a986e88514f928ace082c014fbeb8.jpg)

TYPE E4101
230-240 V 50 Hz 2000 W


ONI PER L'USO DELL'ASPIRAPOLVERE
Dear customer, IMETEC thanks you for having purchased this product. We are certain you will appreciate the quality and reliability of this appliance, designed and manufactured with customer satisfaction in mind. This instructions manual has been drawn up in compliance with the European Standard EN 62079.
IMPORTANT!
Instructions and warnings for a safe use
Please read the instructions on use and safety before using the appliance and follow

these at all times. Keep this manual and illustrative guide with the appliance for future consultation. Should you pass the appliance on to another user, make sure to also include this documentation.
Should certain parts of this booklet be difficult to understand or should doubts arise, contact the company before using the product, by calling the free-phone number indicated on the last page.
INDEX
SAFETY WARNINGS page 8
SYIMBOLS KEY page 9
DESCRIPTION OF THE APPLIANCE AND ACCESSORIES page 10
ASSEMBLY page 11
| ACCESSORIES | page 11 |
| USE | page 11 |
| MAINTENANCE | page 12 |
| DISPOSAL | page 14 |
| SERVICE AND WARRANTY | page 14 |
| ILLUSTRATIVE GUIDE | I-II |
| TECHNICAL DATA | III |
SAFETY INSTRUCTIONS
- Remove the packaging. Check the device and the accessories against the drawing and make sure these were not damaged in any way during transport. If in doubt, do not use the device and contact the authorised assistance service.
- Do not let children play with the packaging! Keep the plastic wrapping out of the reach of children; risk of suffocation!
- Before connecting the device to the mains, check that the network voltage is the same as the voltage rating stated on the identification plate. The identification plate is attached to the device.
- This appliance must be used only for the purpose for which it was designed, that is as a vacuum cleaner for home use. Any other use is improper and potentially dangerous.
- The appliance is not to be used by persons (including children) with reduced physical, sensorial or mental abilities, or with no experience or knowledge, unless supervised by a person responsible for their safety, supervision or after having received instructions regarding its use.
Children must be supervised to ensure they do not play with the appliance.
•[∅DO[NOT(use[the[vacuum]cleaner[to[vacuum:
[[-burning[ashes,[cigarette[butts[or[similar;
[[-liquids,[such[as[rug[detergents;
[[-sharp[or]hard[objects]such[as[nails,large]shards[of]glass;
[[-fine[powder,[such[as[ cement[for[example;
[[-dust[from-toners[(for[laser[printers,[copiers,[etc.)
• [∅]NEVER[vacuum[without(inserting[the[dustartoaction[bag, the[dust[container[or[the[filter.
• [ ⊗DO[NOT[use]the[appliance]with[wet]hands,[damp]feet[or]barefoot.
•[∅DO[NOT]pull[on]the[cord]or[device]to[unplug]the[latter]from[the[mains]socket.
• [ ⊗]DO[NOT]expose[the]appliance[to]humidity[or]weatherconditions.
•[ Always[disconnect[the]appliance[from]the[mains[supply]before[cleaning[or]performing[maintenance]and[when[the]appliance=is[not[in]use.
•[ In[case[of[fault]or[malfunctioning[of[the]appliance,[switch[it]off[and[do[not[tamper]with[it.
•[ If[the=device[needs[to]be[repaired,[contact[an]authorized[technical]assistance[centre.
•[ If[the]power[cable]is[damaged[it]must[be]replaced[by[an]authorised[technical]service[centre,[so]as[to]prevent[all]risks.
•[ ⊗DO[NOT[pull[or[lift[the[vacuum[cleaner[by[means[of[its[cable.
• [∅]NEVER[submerge[the]appliance[in]water[or]other[liquids.
• [∅[NEVER[point[the[flexible[vacuum[hose, [tube, [or[any[other[accessory[towards[eyes[or[ears[and[do[ not[place[in[mouth[when[connected[to[a[running[vacuum[cleaner.
•[ Always[use[the]appliance[with[the]filter[protecting[the]motor[in]order[to]avoid[damaging[the]motor[or[the]vacuum[cleaner.
•[ Always[unwind[the[power[cord]completely[in[order[to]avoid[dangerous[overheating.
SYIMBOLS[KEY
 | Class II appliance |
 | On/off switch |
 | Button for automatic cord winding |
GB
DESCRIPTION[OF[APPLIANCE[AND[ACCESSORIES[[Fig.[A]
Refer to figure [A] in the illustrative guide to verify your appliance equipment. All figures are at the front of this instruction manual.
1 Grip
2 Device for manually adjusting the air flow
3 Suction hose
3A Adjustable telescopic hose
3B Telescopic hose adjustment button
4 Flexible suction hose
5 Buttons for fastening the suction hose
6 Combined rub/floor brush
6A Brush position switch
7 Accessories
7A Brush for parquet
7B Dusting nozzle
7C Nozzle for padding
7D Nozzle for slots
8 Power cable with plug
9 Electronic power adjustment
10 Hepa filter
11 Grid for Hepa filter
12 Parked position
12A horizontal
12B vertical
13 ON/OFF switch
14 Handle
15 Release button for dust collection compartment
16 Button for automatic cord winding
17 Motor protection filter
18 Dust collection system
18A Safety interlock
18B Dust container
18C Lower cover
18D Key for opening lower cover
18E Filter protection grid
18F Cyclone filter
19 Suction connection
20 Dust collection compartment handle
ATTENTION!
The vacuum cleaner is equipped with a motor saving thermostat that intervenes in case of overheating (caused by obstructing the suction opening, filters...). In case of intervention, shut-off the appliance by pressing the ON/OFF switch and let it cool down completely for a few hours. Before restarting, verify if dust has obstructed the filters or the suction opening.
ASSEMBLY
- Connect the flexible suction tube (4) to the suction connection (19) of the appliance. Pay attention to the correct position of buttons used to fasten the suction hose (5); by clicking into its seat it indicates that it has been attached correctly [Fig. B1].
- Connect the handle (1) of the flexible hose to the suction hose (3). Adjust the length of the adjustable telescopic hose by pressing the adjustment button (3B) in the direction of the arrow and extending or retracting the telescopic tube [Fig. C1].
- Select the combined brush (6) or accessory (7) that is suitable for the surface being cleaned and connect the element to the suction hose (3).
ACCESSORIES
Combined rub/floor brush (6)
Adjust the combined brush based on the type of floor, using the switch key (6A) [Fig. D1]:
- switch key (6A) position A (extracted brushes): for hard floors
- switch key (6A) position B (retracted brushes): for rugs and carpets
Your appliance is equipped with the following accessories:
Parquet brush (7A): special brush for cleaning parquet floors.
Dusting nozzle (7B): to be applied to the padding nozzle allowing it to slide: to clean small objects, audio and television equipment, computers and furniture;
Nozzle for padding (7C): for cleaning couches, sofas, padded chairs and curtains;
Nozzle for slots (7D): for cleaning corners and slots, for example heating radiators, toe boards, rollers, marquise;
NOTE:
Accessories can be connected to the suction hose (3) or directly to the handle (1).
USE
- Completely remove the power cord (8) until it reaches the red marking and insert the plug into the electrical socket.
The yellow marking indicates that the end of the cord has been reached.
DO NOT PULL THE CORD BEYOND THE RED MARKING.
NOTE:
Please consider that a new appliance may develop certain odours during initial use. These odours are harmless and disappear after a short amount of time. Provide proper room aeration.
GB
- To turn the vacuum cleaner off or on, press the ON/OFF switch (13) once.
- The electronic power adjustment (9) it is possible to adjust the appliance's suction power [Fig. E1]:
Minimum: for curtains, fine and delicate materials
Average: ideal for standard cleaning, for couches, sofas, padded chairs, rugs and carpets
Maximum: for smooth floors.
- The suction power can also be modified using the manual air flow adjustment device (2) located on the handle (1) [Fig. E2]:
Closed: Increases suction power
Open: Reduces suction power
- Open the manual air flow adjustment device (2) to reduce suction power when an object blocking the opening has been vacuumed.
- After using the appliance, shut it off using the ON/OFF switch (13) electrical socket.
- Press the automatic cord winding button (16) [Fig. F1].


and remove the plug from the
to wind the power cord
While winding the cord, hold on to the plug in order to avoid being whipped by the cord. - The flexible suction hose (4) can be disconnected from the appliance before putting it away. To achieve this, press the flexible hose fastening buttons (5) and disconnect the flexible hose.
MAINTENANCE

ENTION!
e appliance off and pull out the plug before opening the appliance! Before re- using the appliance, ensure that all wet-cleaned parts are completely dry!
CLEANING THE APPLIANCE
When needed, clean the appliance using a damp cloth.
DO NOT USE SOLVENTS OR OTHER AGGRESSIVE OR ABRASIVE DETERGENTS. OTHERWISE THE SURFACE RISKS BEING DAMAGED.
CLEANING THE COMBINED BRUSH (6)
With the motor off, rub the brush by hand, in order to remove any remaining dust or fuzz, that will be vacuumed directly.
CLEANING THE DUST COLLECTION SYSTEM (18)
When vacuum cleaner suction power is reducer or dust reaches the MAX level, [Fig. G1] remove any collected dust from the appliance.
NOTE:
Empty the dust container (18) and clean the filters after each use.
If vacuum cleaner suction power is not improved after cleaning the dust collection system, it is probable that the other filters on the vacuum cleaner are very dirty. In that case, replace them.
When replacing the cyclone (18F), it is recommended also replacing the other filtering elements.
Clean the dust collection system according to the following instructions and paying attention to figures in the illustrative guide.
CLEANING THE DUST CONTAINER (18B)
- Press the buttons for fastening the suction hose (5) and disconnect the fl exible suction hose (4) from the appliance.
- Press the release button (15) of the dust collection system (18) and remove it from the appliance [Fig. G2].
- Press the key for opening the lower cover (18D) to open the lower cover (18C) and empty the container [Fig. G3].
CLEANING THE CYCLONE FILTER (18F)
- Remove the dust collection system from the appliance [Fig. G2].
- Press the key for opening the lower cover (18D) to open the lower cover (18C)
- Rotate the cyclone fi iter (18F) anti-clockwise to remove it from the dust container (18B) [Fig. G4].
- Rotate the fi Iter protection grid (18E) clockwise. Remove it from the cyclone fi Iter (18F) and clean both by shaking them or using a brush [Fig. G5].
- If the cyclone filter (18F) is obstructed by dust, wash it carefully using cold water. Pay attention not to damage it and letting it dry completely.
- Dry the fi Iter for at least 24 hours after washing it.

DO NOT USE THE FILTER IF HUMID OR WET.
• Install the fi Iter protection grid (18E) on the cyclone fi Iter (18F) locking it by turning clockwise.
- Insert the cyclone fi Iter (18F) in the dust container so that the arrow on the cyclone fi Iter is aligned with the arrow on the dust container.
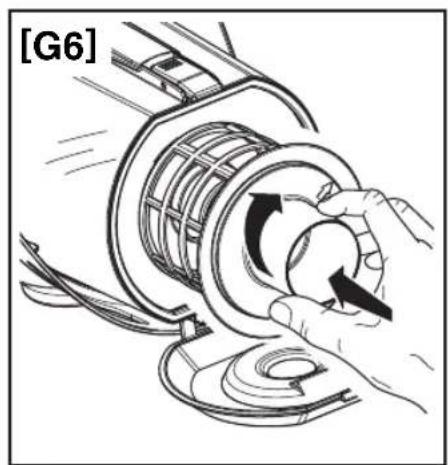
- Rotate the cyclone filter (18F) clockwise to fasten it to the dust container (18B) [Fig. G6].
- Close the lower cover (18C)
- Install the dust collection system (18) on the appliance, making sure that the release key of the dust collection compartment (15) [Fig. G7] clicks.
NOTE:
A safety device (18A) does not allow inserting the dust collection system if the cyclone fi iter is not there.
REPLACEMENT OF THE MOTOR PROTECTION FILTER (17)
- Remove the dust collection system from the appliance [Fig. G2].
- Remove the motor protection fi Iter (17) from the support and replace it [Fig. G8] with a new fi Itering insert.
- Assemble the appliance and insert the dust collection system (18) before starting it.
REPLACEMENT OF THE AIR OUTLET FILTER (10)
- Press the interlock of the Hepa fi Iter grid (11) and remove it [Fig. G9].
- Remove the Hepa fi Iter from the appliance (10) [Fig. G10].
- Replace the Hepa outlet filter (10) with a new one and reinsert it into its seat.
- Reinsert the Hepa fi Iter grid (11) and have the interlock position click.
NOTE:
The air outlet fi Iter (10) must be replaced at least once a year.
PRODUCT STORAGE AND CARE
Before putting the appliance away, it is possible to hook the combined brush (6) to the vacuum cleaner using the horizontal (12A) and vertical (12B) parking position; [Fig. H1, H2].
GB
DISPOSAL

The product is packaged in recyclable materials. Dispose of it in compliance with the environmental protection standards.

The product must be disposed of properly, in accordance with the provisions of European standard 2002/96/EC. The recyclable materials contained in the appliance must be recovered so as to prevent environmental pollution. For further information, contact the local disposal body or the appliance dealer.
SERVICE AND WARRANTY
To request repairs or purchase spare parts, please contact IMETEC's customer assistance service by calling the free-phone number below (only in Italy) or consulting the website.
The appliance is covered by the manufacturer's warranty. For details, read the attached warranty sheet.
Failure to comply with the use and maintenance instructions provided in this user manual will invalidate all and any rights to the manufacturer's warranty.

ASSISTÊNCIA E GARANTIA
GUIA ILUSTRADO
DADOS TÉCNICOS
pág. 26
pág. 28
pág. 28
| - ||
III
ADVERTÊNCIAS SOBRE A SEGURANÇA
ASSISTÊNCIA E GARANTIA


- ONI PER L'USO DELL'ASPIRAPOLVERE
- IMPORTANT!
- Instructions and warnings for a safe use
- INDEX
- SAFETY INSTRUCTIONS
- GB
- DESCRIPTION[OF[APPLIANCE[AND[ACCESSORIES[[Fig.[A]
- ATTENTION!
- ASSEMBLY
- ACCESSORIES
- Combined rub/floor brush (6)
- NOTE:
- USE
- MAINTENANCE
- ENTION!
- CLEANING THE APPLIANCE
- DO NOT USE SOLVENTS OR OTHER AGGRESSIVE OR ABRASIVE DETERGENTS. OTHERWISE THE SURFACE RISKS BEING DAMAGED.
- CLEANING THE COMBINED BRUSH (6)
- CLEANING THE DUST COLLECTION SYSTEM (18)
- CLEANING THE DUST CONTAINER (18B)
- CLEANING THE CYCLONE FILTER (18F)
- DO NOT USE THE FILTER IF HUMID OR WET.
- REPLACEMENT OF THE MOTOR PROTECTION FILTER (17)
- REPLACEMENT OF THE AIR OUTLET FILTER (10)
- PRODUCT STORAGE AND CARE
- DISPOSAL
- SERVICE AND WARRANTY
- ADVERTÊNCIAS SOBRE A SEGURANÇA
- ASSISTÊNCIA E GARANTIA
Brand : IMETEC
Model : FREELY
Category : Vacuum Cleaner